
You're probably here because you've typed tattoo removal tool into a search bar and hoped there might be one simple thing you can buy, use at home, and be done with. That's a very normal place to start. You likely want the same thing: less regret, less hassle, and a safe way to get your skin back.
The confusing part is that the word “tool” makes tattoo removal sound like a quick DIY job. It isn't. Tattoo ink sits deeper than is often understood, and the methods that seem easiest are often the least effective and the most likely to irritate or injure your skin.
If you're trying to sort out what works, what's risky, and what realistic results look like, this guide will walk you through it in plain language.
Table of Contents
- Understanding Your Tattoo Removal Options
- Why Lasers Are the Gold Standard for Tattoo Removal
- Matching the Tool to the Tattoo Ink and Skin Type
- Exploring Alternative and At-Home Removal Methods
- What to Expect from Your Tattoo Removal Journey
- How to Evaluate a Tattoo Removal Provider
- Your Guide to Treatment Preparation and Aftercare
Understanding Your Tattoo Removal Options
When people say they're looking for a tattoo removal tool, they usually mean one of three things. They want a cream, a handheld device, or a professional treatment that works. Those are not equal options.
The first thing to know is simple: the FDA has not approved any do-it-yourself tattoo removal kits or creams, and it states that these products can't reach pigment in the deeper dermis and may cause rashes, burns, or scars. The same FDA page also states that medical consensus does not support the effectiveness of non-laser tattoo removal products, as explained in the FDA's guide to tattoo removal options and results.
That matters because tattoo ink isn't sitting on the surface like dried paint. It's lodged deeper in the skin. A cream may peel, sting, or lighten the top layer of skin, but that's very different from reaching the ink itself.
The common misunderstanding
A lot of DIY products sell the idea that fading skin equals fading ink. That's where people get misled. Surface irritation can make a tattoo look temporarily dull, patchy, or inflamed, but it doesn't mean the pigment has been safely broken apart.
Practical rule: If a so-called tattoo removal tool works only on the surface, it's not doing the job professional tattoo removal is designed to do.
Your real choices
Here's the simplest way to think about the field:
| Option | What it targets | Main concern |
|---|---|---|
| Creams and DIY kits | Mostly the skin surface | Poor results and higher risk of irritation |
| Abrasive or chemical methods | Surface layers of skin | Greater chance of uneven healing |
| Professional laser treatment | Tattoo pigment in the skin | Requires planning, multiple visits, and trained use |
The safest mindset is to stop asking, “What tool can I buy?” and start asking, “What method can remove ink without trading the tattoo for skin damage?”
That shift helps you make better decisions from the start. In real practice, the only tattoo removal tool that consistently makes sense is a professional laser system used by a qualified provider. Everything else should be judged against that standard.
Why Lasers Are the Gold Standard for Tattoo Removal
You see a tattoo you no longer want and start searching for a single tool that can erase it at home. That idea sounds simple. Real tattoo removal is not.
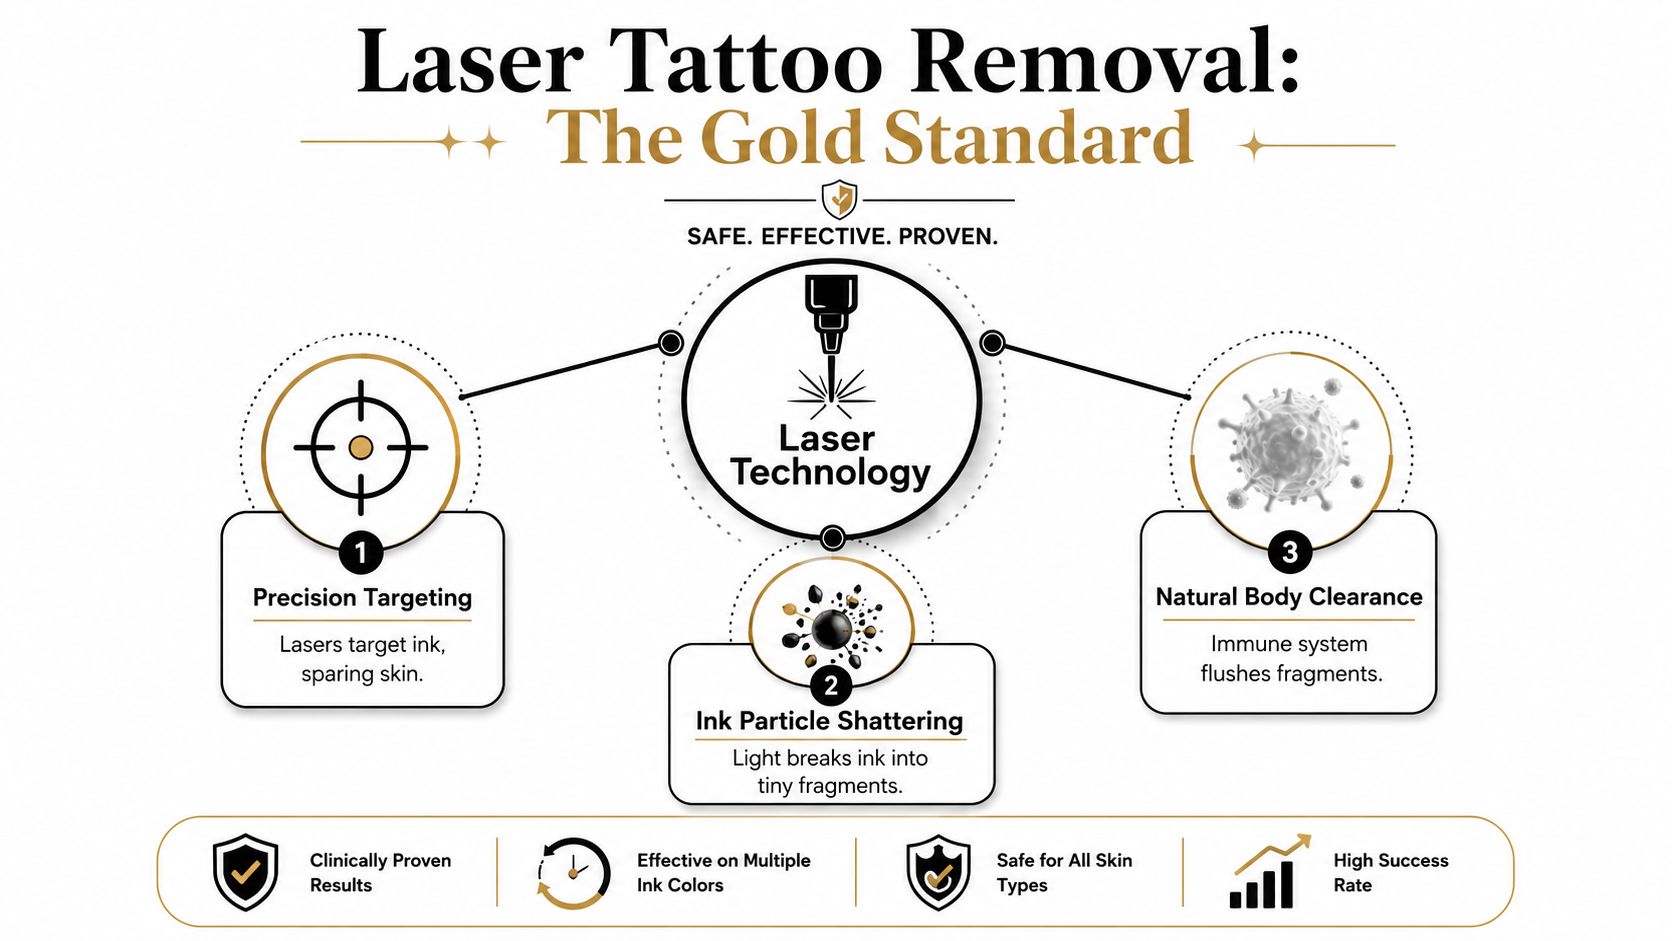
A professional laser works below the skin's surface, where the ink sits. The goal is not to scrub, peel, or bleach the skin. The goal is to break the ink into smaller pieces so your body can clear it bit by bit over time. That difference is the reason lasers remain the standard against which every other method gets judged.
How the laser works
Tattoo ink in the skin works like gravel mixed into concrete. Your body can struggle to remove large pigment particles on its own. A laser sends very short bursts of energy into that pigment, breaking it into smaller fragments that are easier for the immune system to carry away over the following weeks.
That is why removal happens in stages. The laser starts the process. Your body finishes it between sessions.
Good tattoo removal works with normal healing instead of trying to force the skin to shed the tattoo all at once.
Picosecond and nanosecond lasers
The terminology can sound technical, so here is the simple version.
Picosecond lasers deliver energy in extremely short pulses. Those pulses create a strong pressure effect that helps fracture pigment into finer particles. Nanosecond lasers also remove tattoos effectively, but they rely more on heat during each pulse.
For many tattoos, that difference matters. Shorter pulses can improve ink breakup while putting less heat into surrounding tissue. If you want a plain-language explanation of newer systems, this overview of new tattoo removal technology explains the main differences clearly.
Here is the practical takeaway:
- Nanosecond systems are proven and widely used.
- Picosecond systems can break up some inks more efficiently.
- Provider judgment and laser settings matter as much as the machine name.
A newer laser is not a magic wand. A poor operator can still overtreat skin, miss the right settings, or promise results no device can guarantee. In the clinic, safety comes from the full approach: the right wavelength, the right pulse, the right spacing between sessions, and careful skin assessment before treatment begins.
That is the part DIY "tools" miss. Home methods usually act on the surface because they cannot safely deliver controlled energy to pigment sitting deeper in the skin. Professional lasers can do that with precision, which is why they have a real role in tattoo removal and why abrasive shortcuts often trade unwanted ink for avoidable skin injury.
Matching the Tool to the Tattoo Ink and Skin Type
A client may come in with a black script tattoo on light skin. The next appointment might be a bright multicolor piece on deeper skin with older, layered ink. Those two tattoos should not be treated the same way, even if the machine is the same.
That is one of the biggest myths behind the phrase "tattoo removal tool." It sounds like there is one device, one setting, and one reliable at-home shortcut. Real tattoo removal does not work that way. A safe treatment plan is more like choosing the right key for the right lock. The wrong match can waste sessions, irritate skin, or raise the risk of unwanted pigment changes.
Why one setting can't treat every tattoo
Tattoo ink colors absorb light differently. Black ink usually responds well to 1064 nm, while other colors may need different wavelengths. Findings published in Scientific Reports describe how response can vary by pigment, which is why a single setting will not treat every tattoo well.
That matters even more with tattoos that combine outlines, shading, color packing, cover-up work, or touch-ups. What looks like one tattoo on the surface may behave like several different targets under the skin.
Here is a simple way to look at it:
| Tattoo characteristic | What it means for treatment |
|---|---|
| Solid black linework | Often responds to one main wavelength approach |
| Mixed-color tattoo | Usually needs more than one treatment strategy |
| Bright or stubborn colors | May clear more slowly and need careful laser selection |
| Different skin tones | Need settings that protect skin while still targeting ink |
Skin type changes the plan too. In darker skin tones, the provider has to protect natural melanin while still reaching the tattoo pigment. That balancing act is one reason DIY devices and creams fall short. If you want a plain-language breakdown of whether tattoo removal creams work, the short answer is that surface products do not solve the deeper problem.
What a trained provider adjusts
The machine is only part of the treatment. The provider is also choosing how that machine is used, based on the tattoo and the skin in front of them.
A trained clinician looks at:
- Ink color mix: Black, red, green, and yellow do not respond the same way.
- Ink density: Heavy, packed-in areas usually need a different approach than soft shading.
- Tattoo depth and age: Older or layered tattoos can behave differently from newer work.
- Skin response during treatment: Frosting, redness, and healing patterns help guide safe settings.
- Treatment goal: Lightening a tattoo for a cover-up is different from trying to fade it as much as possible.
Multicolor tattoos often cause the most confusion for new clients. People hear about one "better" laser and assume it solves everything. In practice, some newer systems can improve breakup of harder-to-treat colors, but results still depend on wavelength choice, settings, skin type, and provider judgment.
In day-to-day clinic terms, the "tool" is never just a device sitting on a cart. It is the combination of the right wavelength, the right pulse characteristics, careful skin assessment, and an operator who knows when to push treatment and when to stay conservative. That is the difference between a treatment plan built on science and a DIY method built on guesswork.
Exploring Alternative and At-Home Removal Methods
A lot of new clients start in the same place. They search for a tattoo removal tool, hoping there is one simple device or cream they can use at home to make the ink fade safely.
That idea is understandable. It is also where many people get misled.
Tattoo ink does not sit on top of the skin like marker on a countertop. It sits deeper in the skin, so methods that scrub, peel, or burn the surface often affect the skin more than the pigment. That is the core problem with DIY removal. The method feels active, but the action is happening in the wrong place.
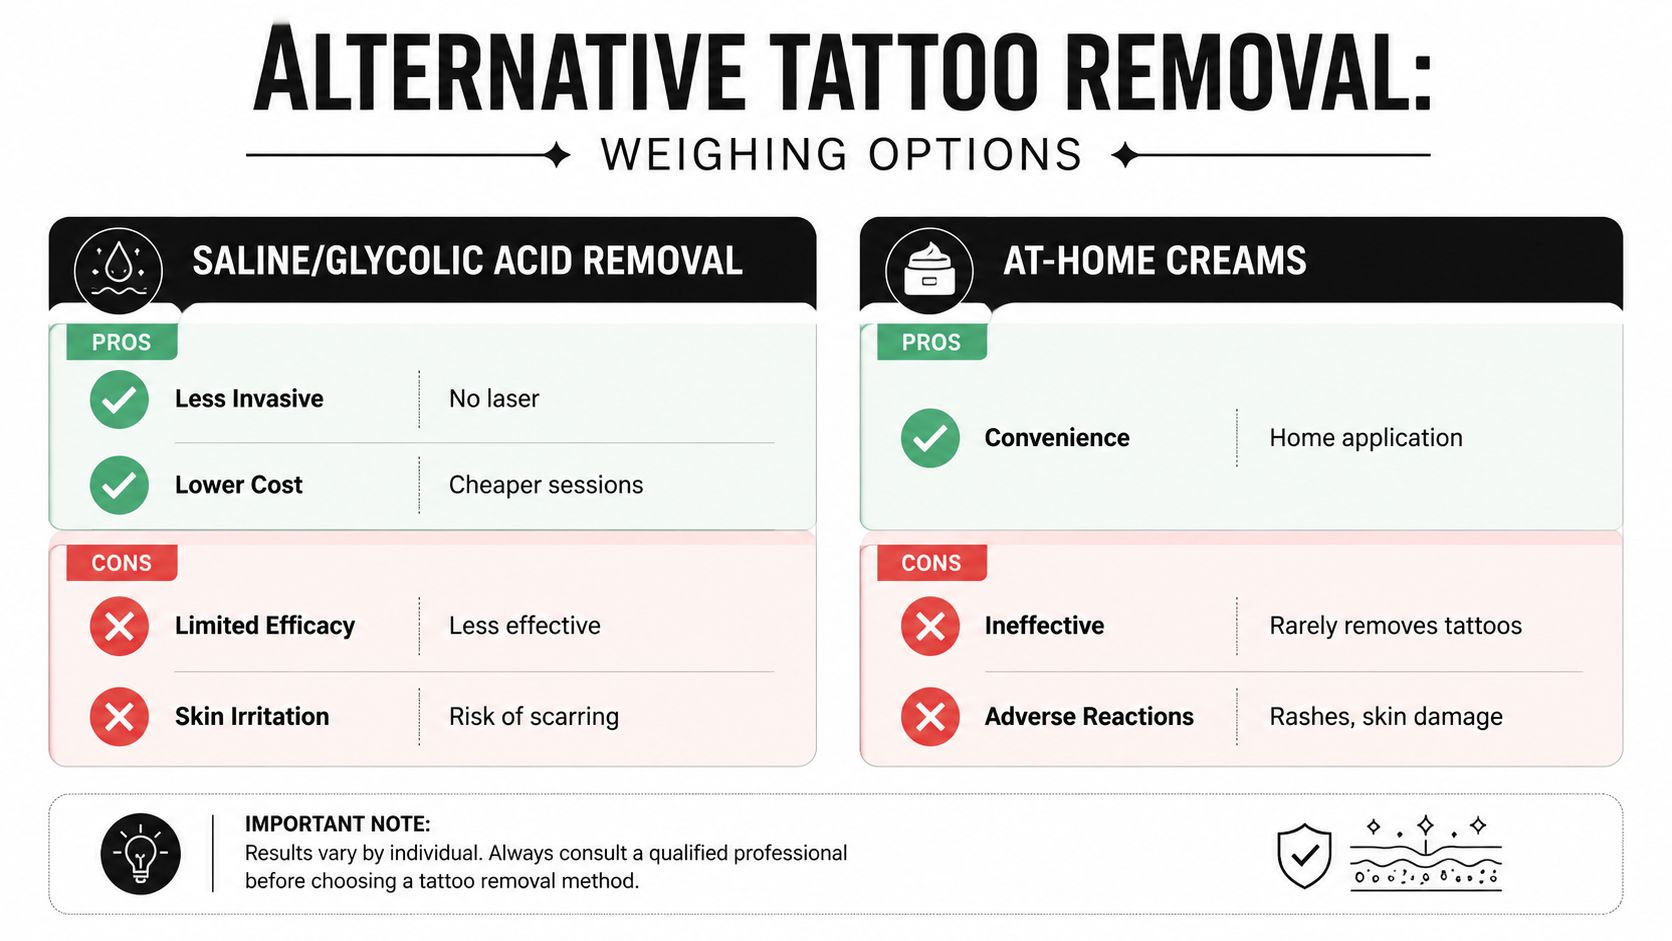
How non-laser methods compare
People usually ask about three categories.
- Saline or glycolic acid approaches: These methods are often presented as gentler alternatives, but they work by creating controlled injury or irritation in the skin. That can sometimes lighten a tattoo slightly, especially in very limited cases, but results are less predictable and skin texture changes are a real concern.
- At-home creams: Creams are easy to buy and easy to apply. The problem is depth. If the product mainly works at the skin surface, it cannot reliably reach the ink particles placed deeper in the dermis. A more detailed explanation is in this guide on whether tattoo removal creams actually work.
- Dermabrasion-style methods: These are based on sanding or removing layers of skin. The tradeoff is straightforward. More aggressive surface damage raises the risk of scarring, uneven pigment, and prolonged healing, while still not giving the kind of targeted ink breakup that a laser can provide.
A simple rule helps here. Pain, peeling, and scabbing are signs of skin injury. They are not proof that tattoo ink is being removed in a controlled way.
Why the myth of a single at-home tool falls apart
People often picture tattoo removal as a basic hardware problem. Buy the right tool, use it enough times, and the tattoo disappears. Skin does not work that way.
A tattoo has variables. Ink color, ink depth, layering, location on the body, and your skin's healing response all affect what happens. A one-size-fits-all home method cannot adjust for those variables. That is why DIY tools and harsh home remedies tend to rely on blunt force. They irritate everything in the area instead of selectively targeting pigment.
That difference matters even more with colored tattoos. Bright or mixed pigments already make removal more complex. Professional treatments can be adjusted to address those challenges. Home methods cannot make that kind of distinction, so the skin often pays the price while the ink changes very little.
Safety first, expectations second
Non-laser options may still come up in conversation, especially for clients who feel nervous about lasers or want a lower upfront cost. That hesitation is normal. What matters is understanding the tradeoff before you try anything.
At-home removal methods usually offer less control, less predictable fading, and a higher chance of unwanted skin changes. Professional treatment is not magic, and it is not instant, but it is built on a method that targets pigment with much more precision.
If your goal is the safest path with the most realistic chance of visible fading, the better question is not, "What at-home tool should I buy?" It is, "What treatment is designed to reach tattoo ink without causing unnecessary damage to my skin?"
What to Expect from Your Tattoo Removal Journey
You come in after your first session, look in the mirror a week later, and wonder why the tattoo is still there. That reaction is common. Removal works more like lightening layers of paint over time than wiping marker off glass in one pass.
Your body needs time between sessions to clear the ink particles that the laser has broken apart. Slow, steady fading is usually a normal part of the process, not a sign that treatment has failed.
Choosing your goal before you start
The first question is not always, “Can this disappear completely?” A better starting point is, “What result do I need?”
If you want space for a cover-up, partial fading may be enough. If you want bare skin again, the plan is usually longer. The same tattoo can have two different successful outcomes depending on your goal.
A cover-up fade often takes fewer sessions than full removal, which can make the process feel more manageable for some clients. This practical difference is explained in this cover-up fading reference.
That choice matters because expectations shape the whole experience. Clients who start with a clear target usually feel less frustrated along the way.
Why timelines vary so much
Two tattoos can look similar from across the room and respond very differently once treatment starts.
Ink density, color mix, placement on the body, your immune response, and how well the area heals all affect the pace. A tattoo on the ankle often moves more slowly than one on the upper arm. Older, already-faded tattoos may behave differently from newer, heavily packed ones.
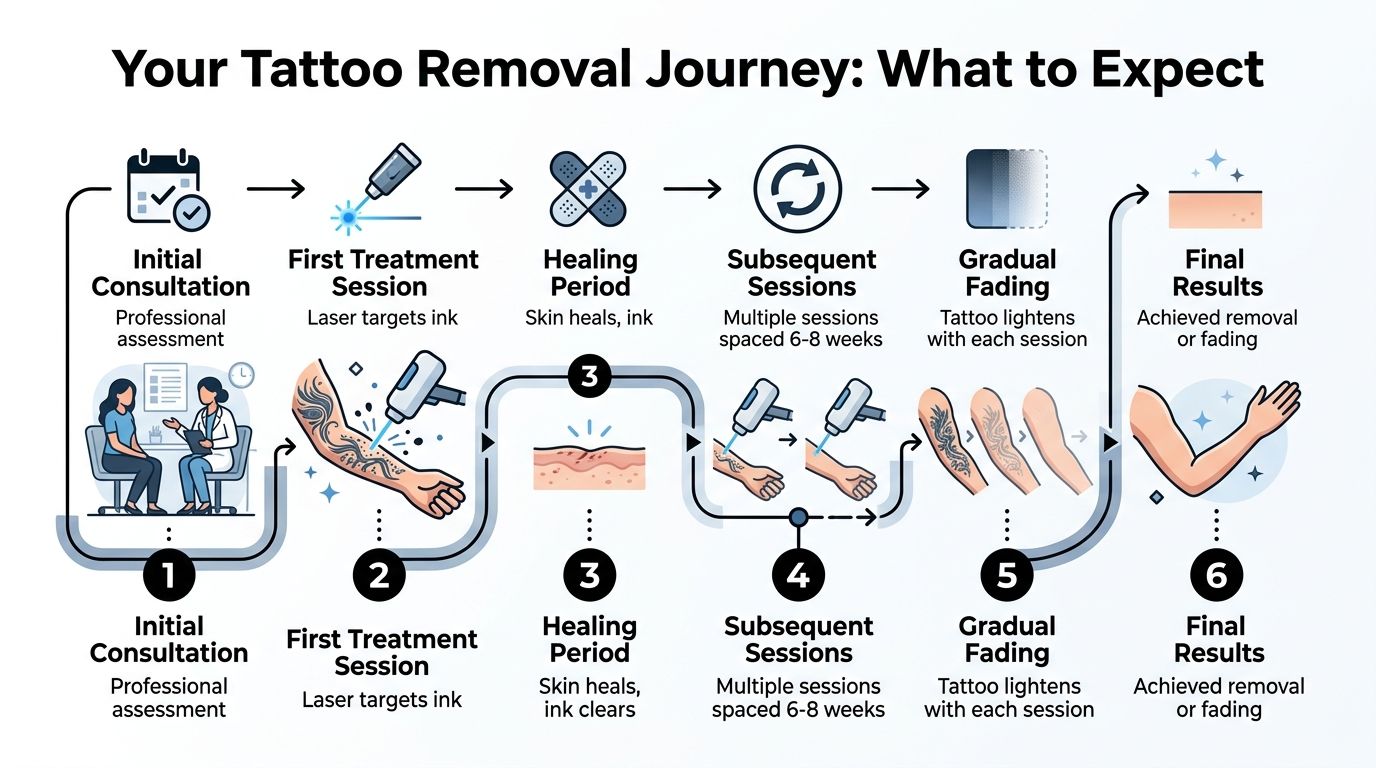
Here is the usual rhythm:
- Consultation. Your provider looks at the tattoo, your skin, and your end goal.
- Treatment session. The area may turn white or look raised for a short time right after the laser passes.
- Healing time. The skin settles first. Fading develops gradually after that.
- Repeat visits. Each session builds on the last one.
That staircase approach is the part many people do not expect. One treatment does not remove a tattoo all at once. It starts a process your body continues between appointments.
What progress can look like
Progress is rarely perfectly even. One section may fade faster than another. Black ink may respond before green or blue. A tattoo can look unchanged for a while, then noticeably lighter after the skin has had more time to recover.
That is one reason DIY “tattoo removal tools” create so much confusion. They are sold as if one device or method should work on every tattoo in the same way. Professional treatment does not work like that. It is adjusted over time based on how your skin and ink are responding.
Some clients need full removal. Others only need enough fading to give a tattoo artist clean room to work. Both are valid goals.
If you are comparing clinics, reputation and communication matter too. A provider with clear client feedback, or a team that actively manages patient communication the way Data Hunters Agency helps brands manage online reviews, is often easier to evaluate before you commit.
As noted earlier, EradiTatt Tattoo Removal offers laser tattoo removal for both complete removal and cover-up fading.
How to Evaluate a Tattoo Removal Provider
You are not hiring a gadget. You are choosing a medical-style service that uses specialized equipment on living skin. That difference matters, especially if you started this search hoping there might be one simple at-home tattoo removal tool that works for everyone.
A trustworthy provider will explain why removal is not a one-size-fits-all process. Professional lasers are adjusted to the tattoo, the ink, and your skin. DIY tools and shortcut methods usually skip that step, which is one reason they create so many problems.
The consultation is where you can tell whether a clinic treats tattoo removal like careful technical work or like a quick sale. A good consultation feels clear and specific. You should leave with a better understanding of your options, your likely timeline, and the limits of treatment.
Questions worth asking at the consultation
Bring a short checklist. It keeps the conversation practical and makes it easier to compare clinics later.
- Who will perform the treatment: Ask about training, licensing where applicable, supervision, and how much of their work is tattoo removal.
- What laser systems they use: Different tattoos respond differently. A qualified provider should be able to explain how they handle darker ink, harder colors, and different skin tones.
- How they evaluate your tattoo: They should examine ink colors, density, location, age of the tattoo, your skin type, and whether you want full removal or fading for a cover-up.
- What results are realistic for you: Look for plain language. A careful provider should explain that some tattoos fade faster than others and that progress is rarely perfectly even.
- How they space treatments: Skin needs time to recover between sessions. If a clinic rushes the schedule without explaining why, ask more questions.
A helpful provider should also ask about your health history, scarring history, sun exposure, and smoking habits. That is the clinical version of checking the full map before starting the trip. If they skip those details, they may be oversimplifying a process that needs careful settings and timing.
Signs a clinic is taking your safety seriously
Safety usually shows up in small, consistent behaviors.
Look for these signs:
- They explain what the treatment can and cannot do: Clear expectations are a safety tool, not just a customer service habit.
- They use before-and-after photos responsibly: Photos should be consistent in lighting, angle, and timing so you can judge progress fairly.
- They discuss skin response and side effects clearly: Redness, swelling, and healing time should be explained in plain language before you commit.
- They provide written instructions: You should not have to memorize aftercare while sitting in the treatment room. If you want an example of what useful client instructions look like, this tattoo removal preparation guide shows the kind of practical information that helps.
- They handle reviews in a transparent way: Reviews should help you see how the clinic communicates, follows up, and responds when clients have questions. For broader context on how businesses organize and monitor customer feedback, Data Hunters Agency explains how review management systems work.
One more thing matters. Pay attention to tone. If a provider guarantees full removal, dismisses the possibility of scarring or pigment changes, or talks as if one machine setting works on every tattoo, treat that as a warning sign.
The best provider is usually the one who makes the process easier to understand. They explain the technology without hiding behind jargon. They answer questions without rushing. They help you see the difference between a risky do-it-yourself promise and a professional treatment plan built around safety, patience, and realistic results.
Your Guide to Treatment Preparation and Aftercare
Good results don't come only from the laser session. They also come from what you do before and after it. Clients are often surprised by how much smoother the process feels when they prepare well and leave the treated area alone while it heals.
Here's a visual example of the kind of treatment-focused site layout people often use when researching clinics and aftercare details.
Before your appointment
Keep your prep simple and consistent.
- Protect the area from sun exposure: Recently tanned or irritated skin is harder to treat safely.
- Arrive with clean skin: Skip products that may sit on the treatment area.
- Stay well hydrated: Healthy skin generally handles treatment and recovery better.
- Review your instructions ahead of time: If you want a practical checklist, this guide on how to prepare for tattoo removal covers the basics in a client-friendly format.
After your session
Right after treatment, short-term changes such as redness, swelling, tenderness, or a frosted appearance can be observed. That can be normal. What matters most is not turning normal healing into preventable irritation.
A good aftercare routine usually comes down to restraint:
- Keep it clean: Follow the cleaning instructions your provider gives you.
- Don't pick or scratch: Scabs, flakes, and irritation need time.
- Reduce friction: Tight clothing and rubbing can slow healing.
- Watch for anything unusual: If something feels off, contact the clinic instead of guessing.
Healing is part of the treatment, not the pause between treatments.
The biggest mistake I see is people trying to speed things up by adding extra creams, scrubs, or home remedies. That usually creates more inflammation, not better fading. A steady routine works better than an aggressive one.
Tattoo removal asks for patience, but it shouldn't feel mysterious. Once you know what the process is supposed to look like, it becomes much easier to stay calm and make smart choices.
If you're ready to talk through your tattoo, your skin type, and whether you want full removal or fading for a cover-up, EradiTatt Tattoo Removal offers consultations across multiple Florida locations and can help you map out a safe, realistic treatment plan.