
You're leaving a laser tattoo removal appointment with a wrapped tattoo, a little warmth in the skin, and a calendar already pressing for attention. Perhaps you're getting married soon, starting a new job, preparing for enlistment, or planning a cover-up with another artist. The practical question isn't just what you should avoid. It's how to sequence recovery around real life without turning a normal reaction into a setback.
Good aftercare instructions make that sequence clear. The first dressing has a purpose, cleansing has a method, and the appearance of redness, swelling, blistering, or flaking changes as the skin repairs itself. Your clinic's specific advice should always take priority, especially if the treated area is extensive or your skin reacts strongly.
Table of Contents
- What to Do Right After Your Session
- Your First 48 Hours of Wound Care
- The Two-Week Healing Timeline
- When You Can Return to Everyday Activities
- Sun Protection That Goes Beyond a Week
- Signs of Healing Versus Warning Signs
- Staying on Track Between Sessions
What to Do Right After Your Session
You walk out of the clinic with the treatment area covered, possibly feeling heat and tingling beneath the dressing. A client often asks the same question in the car: “What am I supposed to do now?” The answer begins with restraint. The dressing is temporary protection, not a covering you should leave indefinitely, and the treated skin needs quiet time before you start caring for it at home.
Warmth, tingling, mild redness, and a tight feeling can be normal inflammatory responses after laser treatment. They don't automatically mean something is wrong. The skin has received energy, and the visible reaction can remain limited to the treatment footprint while the area begins to settle.
Practical rule: Keep your hands off the dressing and the treated skin unless you're cleansing it or applying the product your clinic approved.
A cool compress can make the ride home more comfortable. Wrap the cold source in a clean cloth, use it briefly, and never press ice directly against the skin. Loose clothing helps too, particularly if a waistband, strap, sleeve, or shoe could rub across the area.
Your first checkpoint is simple: when should the initial dressing come off? Major clinical references commonly recommend leaving an initial sterile dressing intact for 24 to 48 hours, and an NHS medical-tattooing leaflet specifically advises keeping its dressing on for 48 hours (American College of Surgeons wound home care guidance, NHS medical tattooing aftercare). Follow the timing your practitioner gave you rather than removing it early because the skin looks uncomfortable.
For a broader reference before your first evening at home, these aftercare instructions for tattoos can help you compare general tattoo-care principles with the plan provided by your removal clinic. You can also review what to expect after your first session of laser tattoo removal so the early appearance doesn't surprise you.
Your First 48 Hours of Wound Care
If you have a wedding in five days, a new job starting soon, or a cover-up consultation booked, the next 48 hours deserve careful handling. Once the dressing comes off according to your clinic's instructions, manage the treated skin gently and judge each step by its condition rather than by a rigid schedule.
Wash your hands before touching the area. Clean the wound with lukewarm water and a mild, approved cleanser. The American Family Physician review describes gentle cleansing and a moist, protected wound bed as established wound-care principles. Avoid directing a forceful shower stream at the treated patch, and do not scrub flakes, crusts, or fluid-filled blisters.
If a dressing has adhered, moisten it with lukewarm water and ease it away slowly. Pulling dry material across crusted or blistered skin can cause unnecessary trauma. Rinse thoroughly, then pat the area dry with clean gauze or a soft, clean towel. Rubbing can reopen fragile skin.
Apply only a thin layer of the ointment approved by your practitioner. Petrolatum-based products can reduce friction and keep the surface from drying excessively. Antibiotic ointment suits some treatment plans but can irritate other skin, so use it only when your clinician has recommended it. For practical guidance on wound care for faster healing, follow the same priorities: clean gently, protect the surface, and limit interference.
Swelling may feel stronger when a treated limb hangs down. Raise it when practical and use a cool compress for short intervals, placing fabric between the compress and your skin. Clear fluid or small blood-tinged bubbles can develop after treatment. Leave intact blisters alone. Their surface protects the recovering skin. Popping one creates an opening where contamination can enter.
At the 48-hour transition, your practitioner may change you from ointment-focused wet management to drier protection. If the surface has closed but clothing or equipment will rub the area, a non-stick pad can sit over a thin ointment layer. Continue the more protective approach if the skin remains raw, blistered, or draining. The condition of the skin matters more than the clock.
The Two-Week Healing Timeline
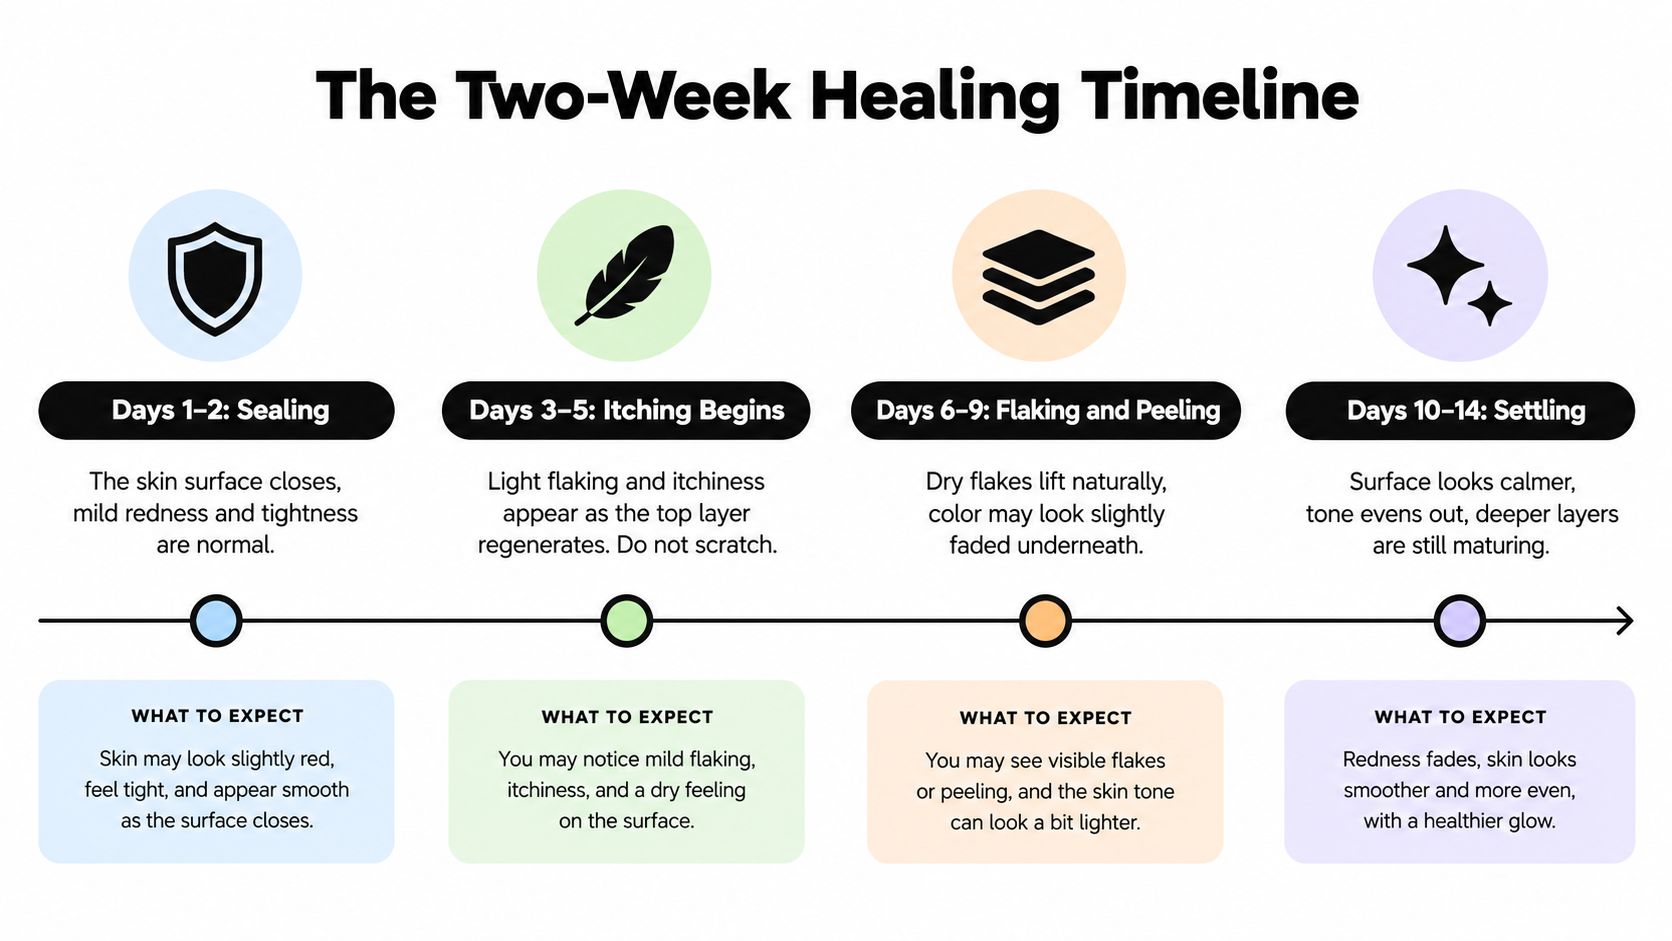
A laser-treated tattoo rarely looks steadily better every day. The surface can darken, crust, flake, and appear temporarily uneven before it settles. Reading the timeline correctly helps you plan a wedding outfit, a uniform requirement, or a cover-up consultation without confusing ordinary healing with treatment failure.
Days 1 through 3 and surface closure
During the opening phase, redness and mild swelling usually begin to settle, while the area may feel tight or tender. Pinpoint bleeding, frosting, and a treatment-shaped reaction can occur. Keep cleansing gentle and protect the skin from friction while the surface starts closing.
This is also the stage when people are most tempted to inspect the area repeatedly. Frequent touching, photographing with different lighting, or adjusting a dressing can cause more irritation than the original treatment.
Days 4 through 7 and crust formation
The treated ink may look darker as pigment fragments and surface crusts become more visible. Flaking can begin, and itching often increases as the upper layer regenerates. Don't scratch or pick. A crust is serving as temporary protection, and removing it early can prolong the open-skin phase or contribute to uneven texture.
Avoid interpreting dark surface material as the final color result. Ink particles remain beneath the recovering skin, so immediate fading isn't a reliable measure of what the body will clear between appointments.
Days 8 through 14 and new skin
New skin may look pink, smooth, slightly raised, or lighter than the surrounding area. The visible surface can appear calmer while deeper tissue continues to mature. Continue gentle care until the area feels intact and no longer reacts to ordinary contact.
Beyond the two-week mark, residual sensitivity can still matter, especially if clothing rubs the site or sunlight reaches it. The next session should be planned around the skin's recovery, not just around how faded the tattoo looks. A practitioner needs a calm, intact treatment area before deciding whether the next appointment is appropriate.
When You Can Return to Everyday Activities
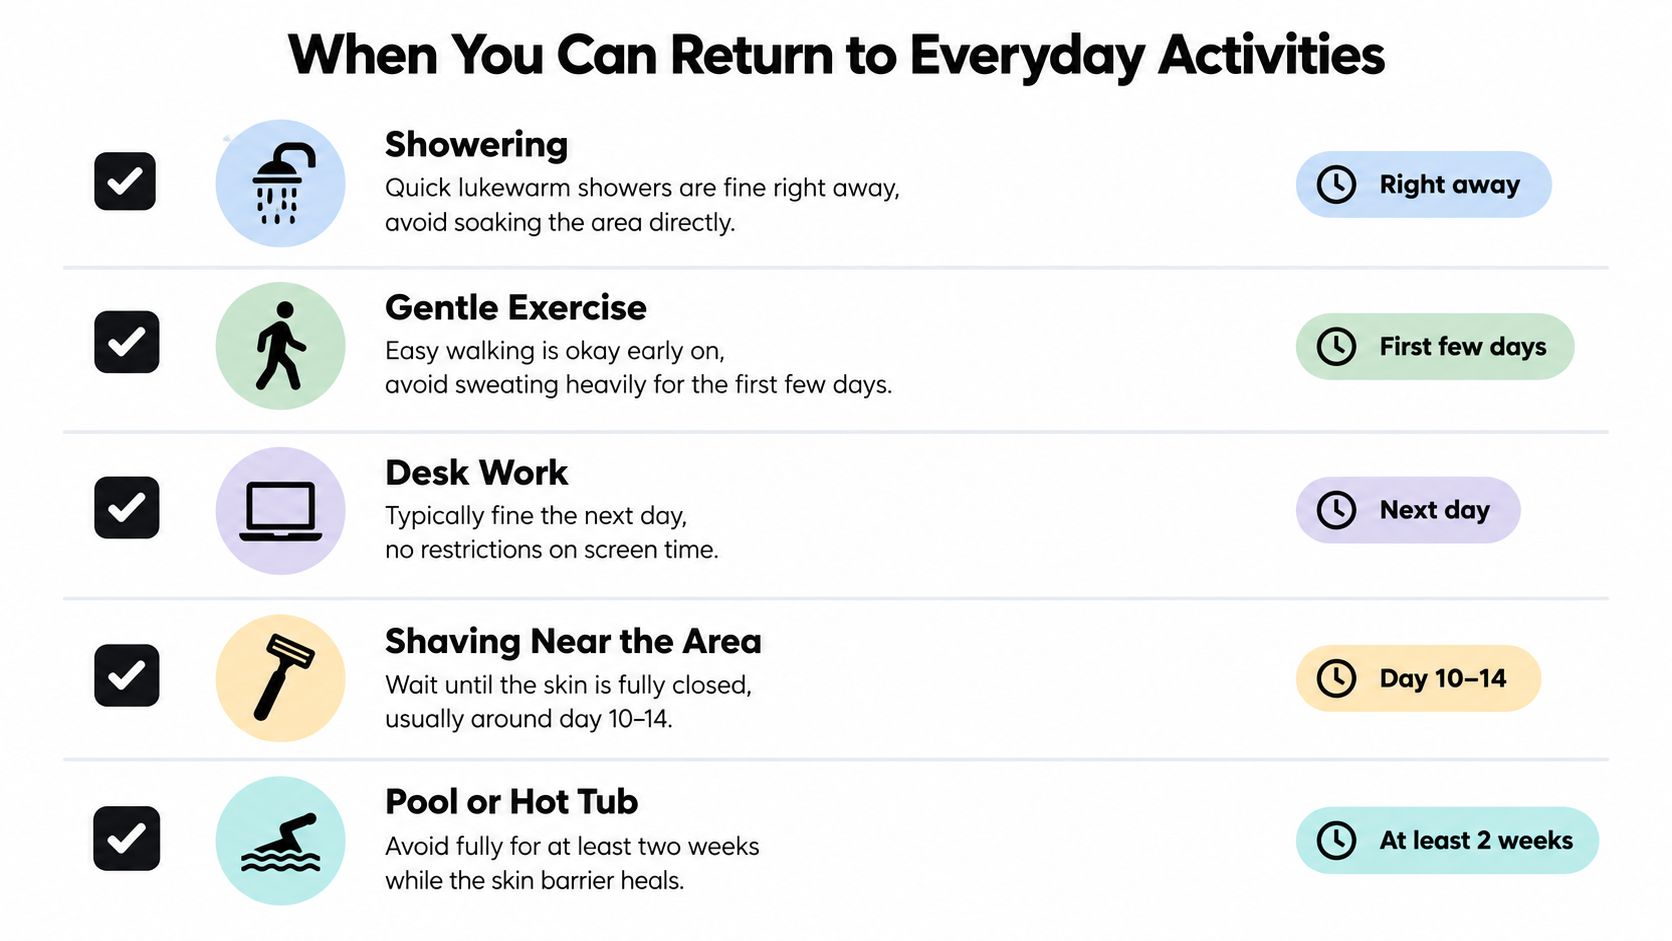
Clients usually want answers that fit a calendar, not a generic list of prohibitions. The safest timing depends on whether the surface is closed, blistered, raw, or still draining, but the following distinctions help you make ordinary plans without taking unnecessary risks.
- Showering: A brief lukewarm shower is generally gentler than soaking, but don't aim a strong stream at the area, scrub it, or rub it dry. Some clinical guidance permits showering after the early dressing period, while other aftercare materials advise keeping the area dry for 7 days, so follow the stricter instruction supplied for your treatment (Leeds Teaching Hospitals medical-tattooing aftercare).
- Gentle exercise: Easy walking may be reasonable when it doesn't create friction or heavy sweating. Delay strenuous activity while blisters or raw skin are present, particularly if clothing presses on the patch.
- Desk work: Sitting at a desk is usually compatible with recovery when the area stays clean and protected. Check straps, chair edges, and clothing seams if the tattoo is on a location that contacts equipment.
- Shaving near the area: Wait until the skin is fully closed and no longer tender or flaky. A razor can catch a crust or blister, so shaving too early trades a short cosmetic convenience for a preventable wound.
- Pool or hot tub use: Avoid swimming, hot tubs, baths, and other soaking activities while the skin is blistered, raw, or broken. The Mayo Clinic's tattoo-care guidance also advises avoiding pools, hot tubs, rivers, lakes, and other bodies of water while a tattoo heals.
Tight waistbands, backpack straps, and sports equipment deserve the same attention as water. If an activity repeatedly rubs the site, postpone it or modify the clothing until the barrier is closed.
Sun Protection That Goes Beyond a Week
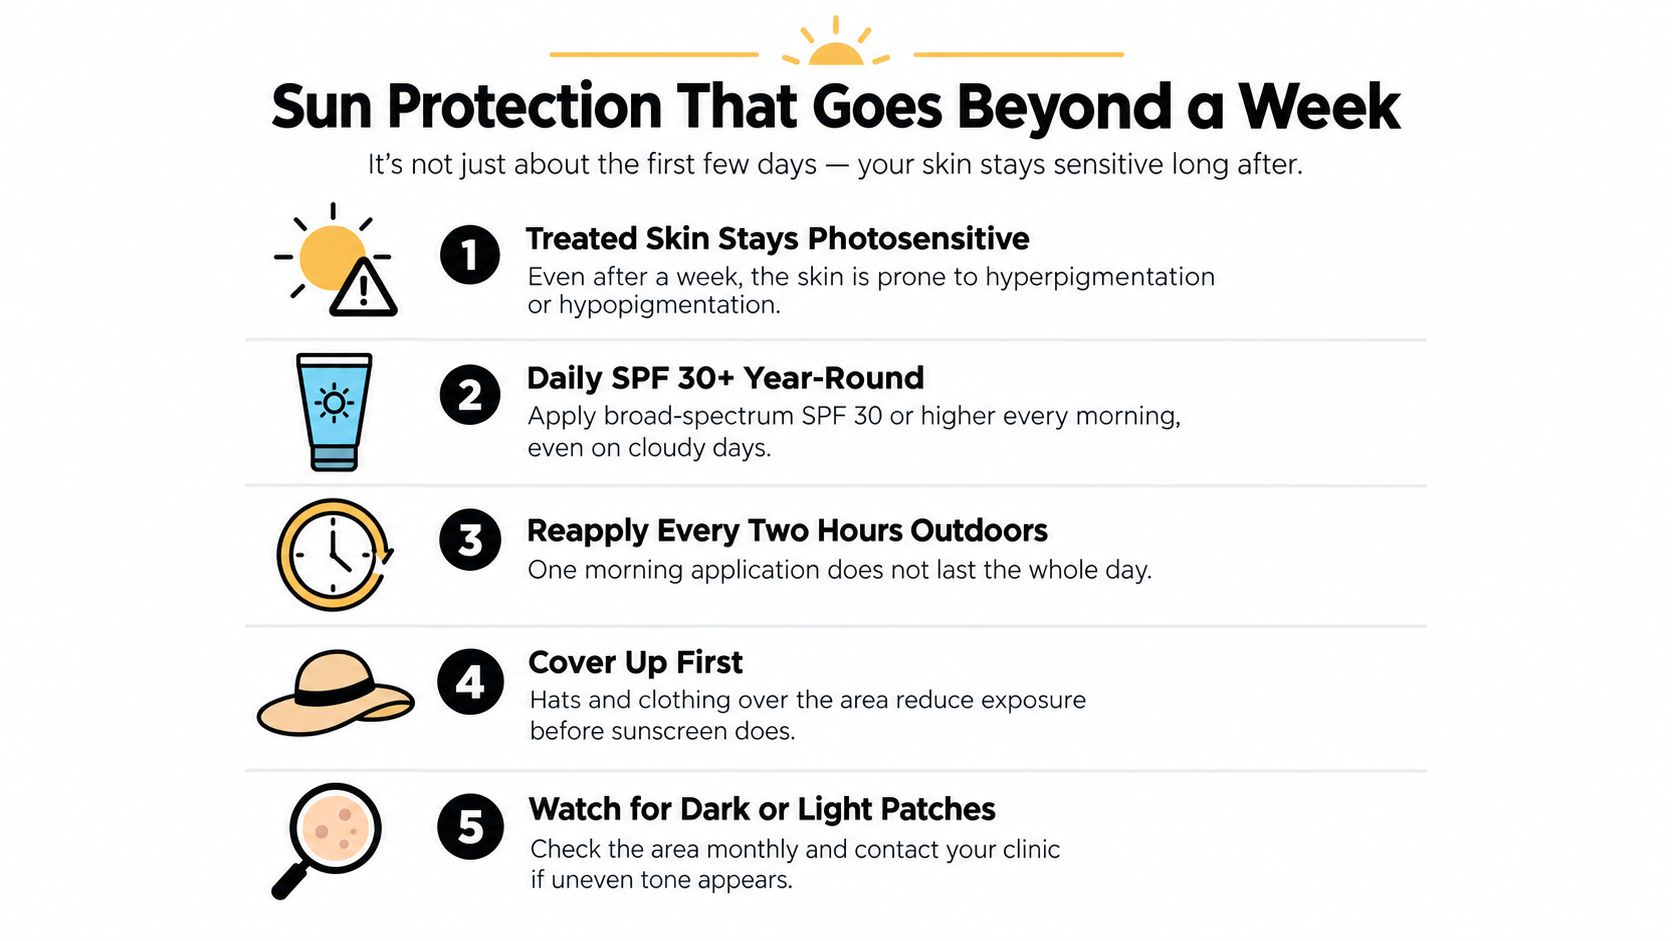
Sunscreen isn't just a first-week task. Treated skin can remain vulnerable to pigment changes after the surface looks normal, and people with darker skin tones may need especially careful protection because post-inflammatory pigmentation can be more noticeable. UV exposure can also irritate recovering skin and complicate the visual assessment your practitioner makes at the next visit.
Use broad-spectrum SPF 30 or higher once the skin has healed enough to tolerate sunscreen, and rely on clothing or physical cover while the surface is still open. Dermatology scar-management guidance recommends SPF 30 protection for 12 to 18 months after procedures, while laser aftercare guidance also emphasizes avoiding direct sun until the barrier has healed and then continuing broad-spectrum protection (American Academy of Dermatology laser-treatment guidance).
The practical routine is straightforward:
- Cover first: Clothing and physical barriers reduce direct exposure before sunscreen is appropriate.
- Apply daily: Use broad-spectrum SPF 30 or higher on healed skin, including on cloudy days.
- Reapply outdoors: A single morning application won't protect you through prolonged outdoor time.
- Avoid tanning beds: Artificial UV exposure creates the same type of pigmentation concern without helping the skin recover.
- Watch for uneven tone: Darker or lighter patches deserve a conversation with your clinic rather than aggressive home treatment.
Sun avoidance is particularly important if you're scheduling treatment around a beach holiday, outdoor wedding, enlistment medical review, or a job that requires exposed skin. The American Academy of Dermatology's tattooed-skin advice supports broad-spectrum SPF 30 or higher for protecting tattooed skin. For comfort after incidental exposure, general guidance on ALODERMA aloe vera after sun may be useful, but aloe vera doesn't replace medical assessment when the treated area is blistered, increasingly painful, or changing unevenly.
You can also compare product categories before your next appointment using this guide to tattoo removal aftercare products. Choose based on your clinician's advice and the current condition of the skin, not on the strongest product label.
Signs of Healing Versus Warning Signs
Normal inflammation follows a pattern. The treated area may show frosting, pinpoint bleeding, mild swelling, limited redness, itching as the skin tightens, or small blisters that crust over. Those findings become more reassuring when they gradually settle rather than spread or intensify.
The concern is a change in direction. Expanding redness, worsening warmth after the early period, yellow or green discharge, foul odor, red streaking, fever, or pain that becomes stronger instead of easing should prompt contact with the clinic. If you're asking yourself whether you should call, call. Clinics generally prefer a quick conversation before a manageable issue becomes a more complicated infection.
| Symptom | Normal Healing | Call the Clinic |
|---|---|---|
| Redness | Stays close to the treatment footprint and slowly settles | Expands beyond the treated area |
| Warmth | Mild early warmth that improves | Warmth worsens after the early healing period |
| Fluid | Clear fluid or small blood-tinged blisters | Yellow or green discharge, especially with odor |
| Pain | Tenderness or discomfort that gradually diminishes | Pain intensifies or becomes difficult to control |
| Skin changes | Itching, crusting, and flaking during repair | Red streaking, rapidly worsening swelling, or spreading irritation |
| Whole-body symptoms | No systemic symptoms | Fever or feeling acutely unwell |
Contact the clinic the same day for fever, rapidly expanding redness, red streaks, foul-smelling discharge, severe worsening pain, or swelling that threatens normal movement. For a less urgent but persistent concern, request the next available assessment rather than waiting for the next scheduled laser session. A medical professional may need to examine the area in person.
Take one photograph daily under similar lighting and from a similar distance. Consistent images show whether redness is shrinking or spreading, and they're more useful than comparing a morning photograph taken in bright sunlight with an evening image under warm indoor light. If you want a focused reference for signs of infection after tattoo removal, use it alongside direct advice from your clinic.
Staying on Track Between Sessions
Aftercare matters because it protects the reason you started. Someone preparing for a wedding may need the treated area calm beneath formal clothing. Someone preparing for enlistment or a job start may care about predictable presentation. Someone planning a cover-up needs controlled fading and healthy skin for the next artist, not rushed treatment that leaves irritation behind.
Between appointments, keep a simple record:
- Session date: Note when treatment occurred and when the first dressing came off.
- Skin response: Record blistering, crusting, unusual pain, or any product reaction.
- Progress photographs: Use consistent lighting, distance, and camera position so fading is easier to judge.
- Lifestyle factors: Tanning, smoking, poor sleep, and dehydration can make recovery and overall health less favorable. Protect the area from UV exposure, support ordinary hydration, and prioritize rest while the skin is repairing.
- Treatment details: If your clinic shares settings or treatment notes, keep them with your photographs for review.
Laser tattoo removal is progressive. Sessions are commonly spaced 6 to 8 weeks apart, allowing the skin to recover and the body time to clear pigment fragments between treatments. Shortening that interval doesn't automatically speed results because treating before the area has adequately recovered can add irritation without giving the clearance process more time.
At the next appointment, expect a skin assessment rather than an automatic repeat treatment. Your practitioner may review photographs, ask how the area behaved, check for lingering sensitivity or pigment change, and decide whether an energy adjustment is appropriate. Bring specific questions: Is the skin ready? Should the dressing or ointment routine change? Can the next session fit my wedding or job timeline? Is the goal complete removal or fading for a cover-up?
When recovery is planned around the milestone that brought you in, aftercare becomes a practical schedule rather than a collection of restrictions.
EradiTatt Tattoo Removal provides progressive laser tattoo removal for clients seeking complete removal or fading before a cover-up, with clinics across Central and West Florida. Visit EradiTatt Tattoo Removal to discuss your treatment timing, recovery questions, and the plan that fits your next life event.
One Response