
Tattoos often look faded or cloudy during healing, but that is usually a temporary optical effect from new skin forming over the ink, not real pigment loss. Real fading during healing is almost always caused by friction, picking, soaking, or sun damage.
So why can a tattoo look washed out even when the artist placed the ink correctly? The confusion comes from treating every change in brightness as the same kind of fading. A healing tattoo can appear dull because the skin is rebuilding itself, or it can lose pigment because the healing area experienced avoidable trauma.
The difference matters. Temporary dullness usually improves as the outer skin matures. True ink loss tends to appear as localized gaps, pale patches, broken lines, or uneven edges. The timeline below will help you tell those experiences apart without judging the tattoo too early.
Table of Contents
- Why a Healing Tattoo Can Look Faded
- The Four Stages of Tattoo Healing Week by Week
- The Silver Skin Phase Explained
- Scabbing, Peeling, and the Risk of Picking
- Aftercare Habits That Cause Real Fading
- How to Tell Normal Dullness From True Ink Loss
- What Fading Looks Like Beyond the First Month
- Healing Timeline and Fading Prevention Checklist
Why a Healing Tattoo Can Look Faded
Does a healing tattoo really fade, or does it only look that way? In the early healing period, “faded” usually describes a change at the surface rather than missing pigment. A fresh tattoo is an open skin injury. Fluid, immune cells, and new skin cells gather in the area while the epidermis repairs itself over the ink held deeper in the dermis.
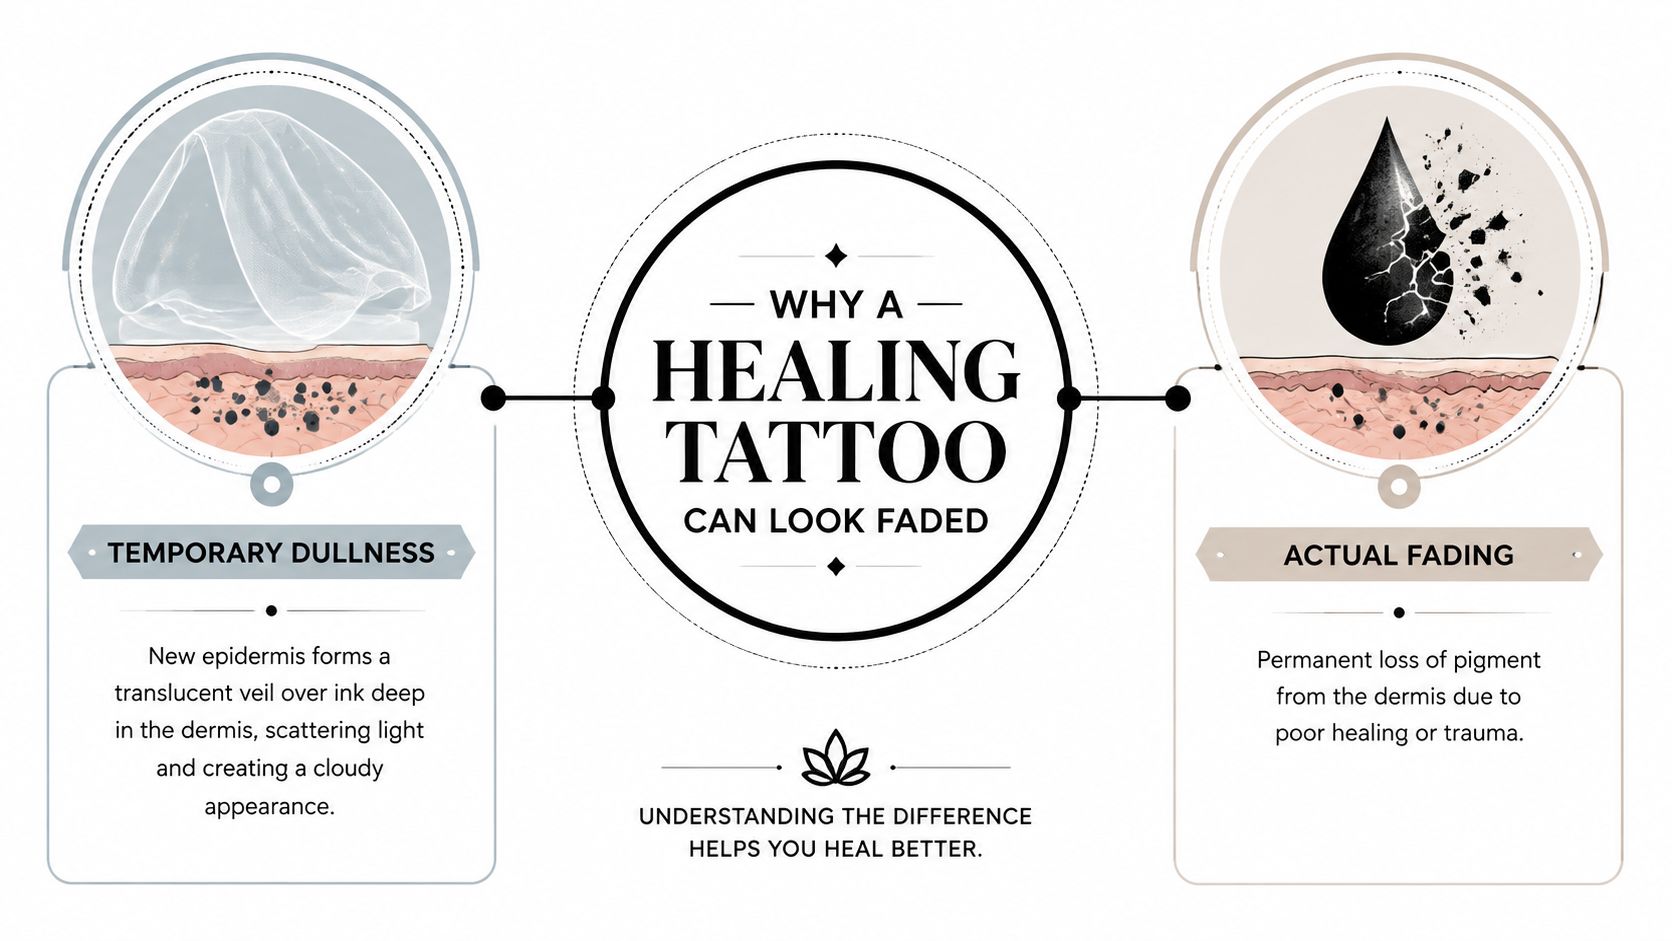
The new epidermis works like a cloudy veil over the design. It scatters light before it reaches the pigment, so black can appear gray, colors may look muted, and fine lines can seem softer than they did immediately after the appointment. A tattoo may look bold and saturated in the studio, then hazy several days later, without the ink itself disappearing.
Two different meanings of fading
Temporary dullness is an optical change at the surface. During the first 1 to 2 weeks, peeling, flaking, and newly regenerated skin can obscure the image. The apparent fade often becomes clearer as that outer layer matures over the following 1 to 2 weeks (tattoo aftercare guidance on the silver skin phase).
Actual fading follows a different pattern. Picking a scab, scratching through clothing, rubbing the area aggressively, soaking the wound, or exposing healing skin to ultraviolet light can disturb the surface before it has sealed. The result may be a localized patch that remains lighter after recovery. In other words, temporary dullness changes how you see the ink, while preventable ink loss changes how much pigment remains.
What the skin is doing
The immune system treats tattoo ink as foreign material while the skin works to close and repair the wound. Plasma can leave a shiny surface at first, followed by dryness, flakes, and a temporarily opaque layer. These visible changes do not automatically mean the tattoo is failing.
A 2020 clinical case report links scented lotion with allergic contact dermatitis, scarring, and premature fading in a new tattoo. The authors warned that this reaction can delay wound healing, contribute to scar tissue formation, and affect fading during the first healing phase, when tattoos commonly take about 1 to 3 weeks to heal (clinical case report on tattoo aftercare and allergic contact dermatitis).
Before an appointment, review placement, design, aftercare, and long-term maintenance. Guidance on what to know before getting a tattoo can help set realistic expectations. These six things you should know before getting a tattoo offer another preparation checklist.
The Four Stages of Tattoo Healing Week by Week
A healing tattoo doesn't change in a straight line. It may look darker first, lighter next, and uneven after that, even when the skin is recovering normally. The key is to judge the pattern and the behavior that preceded it, not one photograph taken under different lighting.
Stage one, days one to three
The tattoo may look unusually bold, wet, or glossy, with redness, swelling, tenderness, and small amounts of clear fluid. The surrounding inflammation can make the design appear sharper and darker than its settled result.
At this point, apparent fading isn't the main concern. The risk comes from touching, rubbing, or using irritating products on vulnerable skin. Worsening redness, severe swelling, increasing pain, or concerning discharge deserves prompt advice from a medical professional.
Stage two, days four to seven
Dryness and early peeling often begin. The image may lose its studio shine and appear muted as flakes form over the design.
A thin flake is usually part of normal recovery. Thick, painful, cracked, or increasingly raised scabbing suggests more stress and should not be pulled away. Let the skin shed naturally.
Stage three, weeks two to three
This is often the stage that alarms first-time clients. Itching, patchy-looking color, and a cloudy or gray cast can make a healthy tattoo seem faded. The regenerated epidermis is still affecting how light travels through the skin.
Localized gaps, broken lines, or a pale area exactly where you scratched or caught a scab point more toward actual ink loss. Uniform dullness across the design points more toward temporary surface haze.
Stage four, weeks four to six
The outer surface becomes clearer while deeper recovery continues. Color usually looks more consistent, and the settled appearance becomes easier to judge.
Surface healing and deeper repair don't always finish together. Some guidance describes full recovery as continuing beyond the point when the tattoo looks healed, so avoid treating a smooth surface as permission for aggressive abrasion or intense exposure (tattoo healing timeline and deeper skin recovery). Full settling can take three months, particularly when the design or placement receives ongoing friction.
| Stage | Timeframe | Appearance | Fading Expectation |
|---|---|---|---|
| Inflammation | Days 1 to 3 | Bold, shiny, red, or swollen | Little visible fading, but the skin is highly vulnerable |
| Scabbing and early peeling | Days 4 to 7 | Dry, flaky, and less glossy | Temporary dullness is common |
| Silver skin and active peeling | Weeks 2 to 3 | Cloudy, itchy, uneven, or hazy | Judge for isolated gaps caused by trauma |
| Deep recovery | Weeks 4 to 6 and beyond | Surface clears and color sharpens | The settled result becomes easier to assess |
The Silver Skin Phase Explained
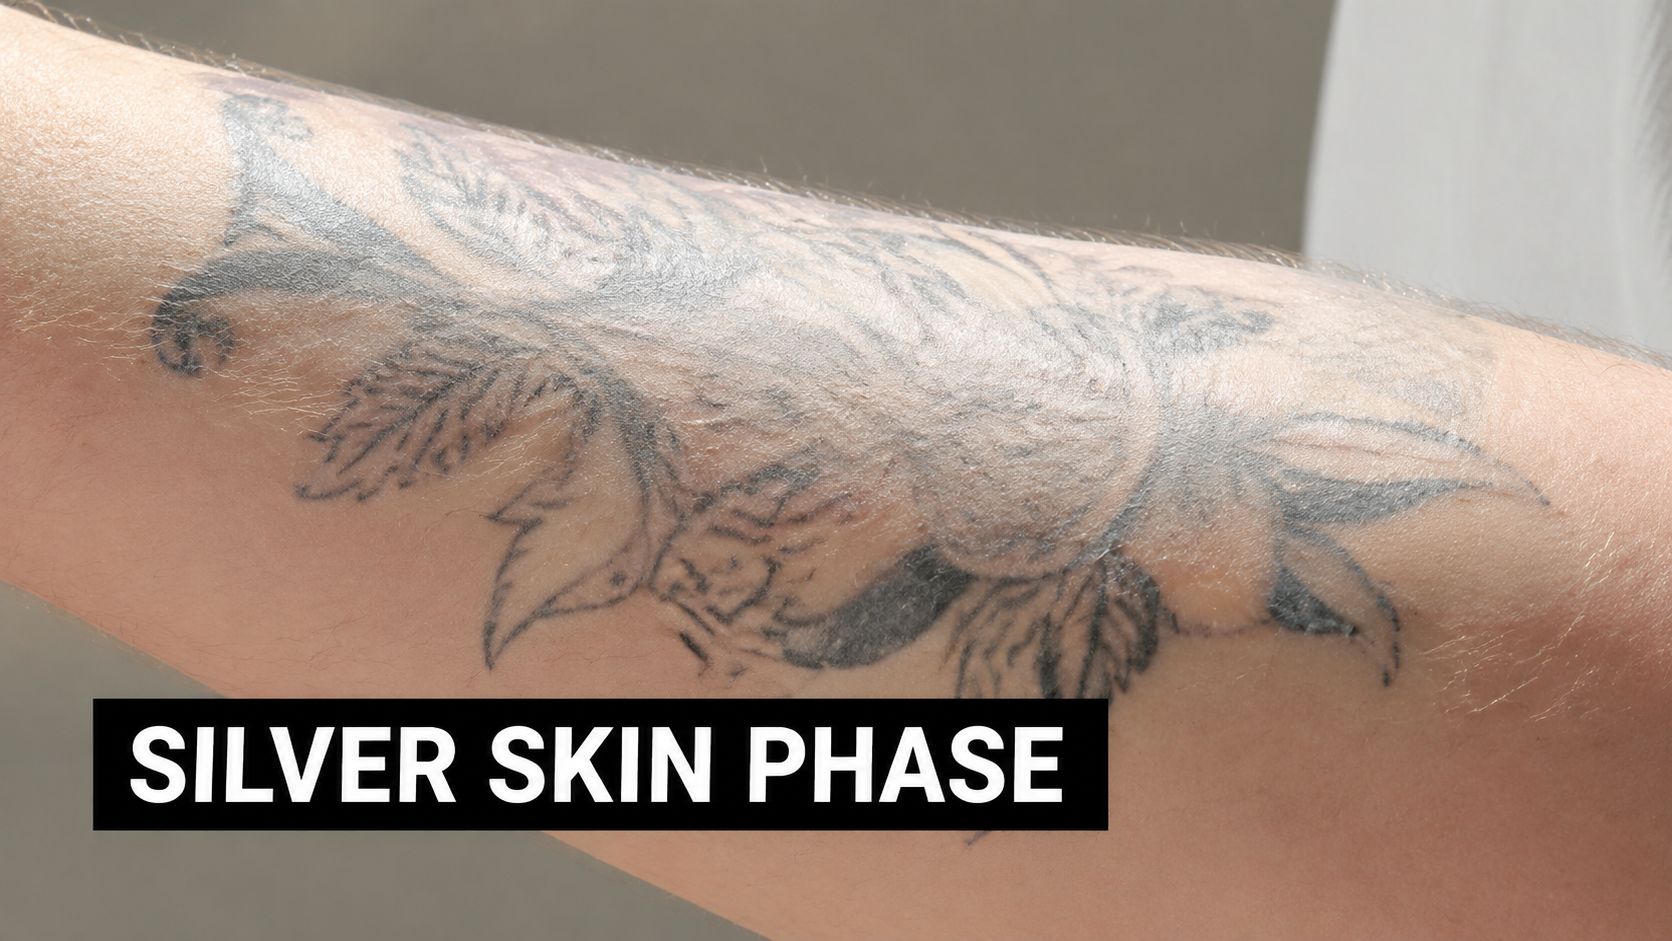
The silver skin phase is the visual reason many people ask, “Why does my tattoo look faded if I've followed every instruction?” New epidermal tissue has a different texture and transparency from mature skin. It can scatter light across the design, producing a pale, shiny, chalky, or gray appearance.
The ink hasn't necessarily become lighter. The surface is changing how you see it.
Why the effect looks uneven
Dense black linework may still look fairly readable because it contains strong contrast. Pastels, bright colors, white highlights, and lightly packed shading can seem more affected because the cloudy surface competes with their subtler tones.
Lighting also changes the impression. Direct bathroom light, a phone flash, or dry skin can make the same tattoo look paler than it does in softer daylight. Comparing photographs taken under different lighting can create the illusion of rapid fading when the main change is visibility.
The phase commonly becomes noticeable during weeks 2 to 4, then gradually improves as the new surface layer matures. Guidance describing this temporary “silver skin” effect notes that the skin can clear over the following weeks rather than losing the ink itself (healing guidance on temporary tattoo dullness).
Practical rule: Don't evaluate the final color while flakes, shine, or a cloudy surface still cover the design.
A useful comparison is a healed scratch that looks pale or white before the surrounding skin fully settles. The mark hasn't necessarily become permanently lighter because of that temporary appearance. Likewise, a tattoo can retain its pigment while the new epidermis makes the image look veiled.
Leave the surface alone. Scrubbing, exfoliating, or trying to reveal the “real” color early can turn harmless dullness into genuine injury.
Scabbing, Peeling, and the Risk of Picking
Peeling itself usually isn't the enemy. Picking is the point where normal healing can become permanent pigment loss. A thin, flexible flake can lift as the outer skin sheds, while a thick or raised scab may indicate deeper irritation or trauma beneath it.
The temptation is understandable. A loose edge catches on clothing, itching builds, and the tattoo looks uneven. Pulling that edge can remove part of the healing scab and the fragile skin attached to it. If pigment leaves with that material, the resulting pale patch may not refill on its own.
Behaviors that create gaps
- Peeling raised edges: Pulling a partially attached flake can expose immature skin and disturb pigment.
- Scratching through clothing: Fingernails can reopen irritated areas even when you don't touch the tattoo directly.
- Rubbing with a towel: A rough towel can catch flakes and scrape the surface after washing.
- Removing flakes early: A piece that looks ready may still be attached to healing tissue.
Normal peeling doesn't require a shortcut. Wash gently as directed by your artist, pat the area dry, and use a thin layer of suitable moisturizer if dryness or itching makes you uncomfortable. Don't seal the tattoo under heavy product, and don't use scratching as a substitute for patience.
How to read the scab
A light flake that falls away without bleeding or exposing a raw surface is generally less concerning than a thick, cracked, painful scab. A clinical report connected poor aftercare and skin reaction with delayed healing, scarring, and premature fading, which is why unusual irritation deserves attention rather than aggressive self-treatment (tattoo aftercare case report).
One heavy picking incident can leave a visible gap, especially during weeks two and three, when itching and peeling are often most distracting. If the area becomes increasingly painful, hot, swollen, or drains concerning fluid, contact a medical professional instead of trying to correct the appearance yourself.
Aftercare Habits That Cause Real Fading
Temporary dullness comes from the healing surface. Real fading comes from stress that removes, disrupts, or damages pigment before the skin has recovered. Products matter, but the larger principle is reducing friction, soaking, ultraviolet exposure, and unnecessary chemical irritation.
Friction and pressure
Tight clothing can repeatedly rub fresh lines and soften or tear scabs. Sleeping directly on the tattoo can stick the area to bedding, while repeated contact with a waistband, shoe, watch, or work surface can create patchy loss.
The risk is greatest while the skin is peeling and tender. Choose loose, clean clothing, avoid pressure where practical, and don't use fabric friction to remove flakes.
Water and chemical exposure
Long hot showers, baths, swimming pools, hot tubs, and ocean water can soften a healing surface and expose it to irritants or contaminants. Soaking can loosen scabs before the skin beneath is ready, which may contribute to uneven color and broken edges.
Aftercare guidance consistently emphasizes gentle washing, thin moisturization, and avoiding submersion until healing is complete (tattoo fading and prevention guidance). A practical tattoo and piercing studio walkthrough can also help first-time clients understand the sterile environment and preparation that surround professional work. For covering questions, review how long you should keep a tattoo covered, then follow your artist's specific dressing instructions.
Moisture and sunlight
Over-moisturizing can leave the area overly wet and contribute to heavier scabbing. Under-moisturizing can allow uncomfortable cracking and make the surface more vulnerable to scratching. The aim is a light, breathable layer, not a glossy coating.
Sun exposure deserves special caution. A medical review of tattoo aftercare recommends keeping a healing tattoo away from sunlight and waiting until it's fully healed before applying sunscreen. Once healed, use broad-spectrum SPF 30 or higher, reapplying every two hours outdoors and after swimming or sweating, particularly when the UV index is 3 or higher (medical review of tattoo aftercare and sun protection).
Exfoliating, shaving, or applying harsh acids before the surface has reset adds avoidable abrasion. Fading prevention is less about finding a miracle lotion and more about giving immature skin fewer chances to break down.
How to Tell Normal Dullness From True Ink Loss
Look at the pattern, not just the brightness. A tattoo that appears evenly muted from edge to edge is behaving differently from one with small missing sections.
Normal dullness often has three qualities:
- Even coverage: The whole design looks cloudy or softened rather than one isolated section.
- Changing visibility: The image seems clearer after flakes fall away or the surface becomes less shiny.
- No specific trauma: You can't connect the change to scratching, picking, rubbing, soaking, or sun exposure.
True ink loss usually looks more localized. You may see a broken line, a pale dot, a missing section of a color block, a patchy edge, or a gap that follows the exact place where a scab was removed.
A simple mirror check
Use consistent conditions. Look at the tattoo in good, indirect light, then compare an early photograph with a later one taken from the same distance and angle. Don't compare a wet studio image with a dry healing image and assume the difference represents permanent loss.
| Visual Cue | Temporary Dullness | True Ink Loss |
|---|---|---|
| Distribution | Broad and relatively even | Concentrated in isolated spots |
| Surface | Cloudy, shiny, flaky, or hazy | May show a gap, thin area, or damaged texture |
| Timeline | Changes as the outer skin matures | Persists after the surface settles |
| Likely trigger | Normal peeling and new epidermis | Picking, scratching, friction, soaking, or UV |
| Design detail | Softened but still present | Broken lines or missing color |
Raised scarring or unusually shiny, thinned skin can suggest more than ordinary surface haze. A medical professional should assess concerning skin changes, while a tattoo artist can later advise whether a settled area might need a touch-up. Don't ask an artist to judge the final result while active peeling still obscures the design.
What Fading Looks Like Beyond the First Month
Healing-month dullness and long-term tattoo aging are different conversations. Early haze comes from the changing epidermis. Later fading reflects the way skin, pigment, sunlight, and repeated friction interact over time.
A 2011 dermatology study of red tattooed skin measured mean pigment concentration at 0.077 ± 0.046 mg/cm² years after tattooing, compared with an estimated 0.60 to 9.42 mg/cm² directly after tattooing. Those measurements imply an average decrease of roughly 87% to 99% in pigment concentration over time, showing that some biological pigment loss is a normal long-term outcome (dermatology study of red tattoo pigment concentration).
Three aging patterns
- Gradual UV breakdown: Repeated sunlight can soften color and reduce contrast across exposed areas.
- Ink migration: Pigment can spread beyond the original boundaries, making lines look softer or blurred rather than merely lighter.
- Mechanical wear: Fingers, elbows, waistbands, and other high-contact areas may lose clarity unevenly.
Style also affects perception. Watercolor work, delicate linework, and micro-realism can appear softer as their subtle transitions settle, which isn't always the same as a damaged tattoo.
Laser removal uses the same basic pigment-destruction principle as sunlight, but in a much more concentrated way. If you're considering complete removal or controlled fading for a cover-up, information about preparing for a tattoo cover-up can help separate planned pigment reduction from ordinary aging.
Healing Timeline and Fading Prevention Checklist
Use your artist's aftercare instructions first, especially when they differ because of the dressing, placement, or technique used. The checklist below connects each habit to the type of stress it helps prevent.
Weeks one and two
- Wash gently: Remove surface residue without scrubbing, which limits abrasion.
- Pat dry: Press with a clean disposable towel instead of rubbing, reducing the chance of catching flakes.
- Don't soak: Avoid baths, pools, hot tubs, and other prolonged water exposure while the wound is open.
- Don't pick: Let scabs and flakes detach naturally, preventing pigment from leaving with them.
Weeks two through four
- Moisturize lightly: Use enough product to reduce dryness without leaving a heavy, wet layer.
- Wear loose clothing: Reduce repeated rubbing across peeling lines and tender skin.
- Stay out of direct sun: Healing skin is vulnerable to UV-related pigment damage.
- Skip exfoliants: Avoid abrasive scrubs and harsh active products until the surface has recovered.
Months one through three
- Use sunscreen on healed skin: Apply broad-spectrum SPF 30 or higher once the tattoo is fully healed, following the sun-protection guidance cited earlier.
- Watch the texture: A changing silver cast is different from a persistent gap or raised scar.
- Delay final judgment: Deeper recovery can continue after the surface looks smooth, so assess the design gradually.
Three months and beyond
- Maintain sun protection: Regular SPF helps limit ongoing UV breakdown.
- Notice friction zones: Repeated contact can create patchy wear even after healing.
- Ask about touch-ups only after settling: A tattoo artist can assess whether a small area needs refinement.
Quick timeline recap
- Days 1 to 3: The tattoo looks bold, shiny, and inflamed.
- Days 4 to 7: Dryness and peeling begin, and the design loses its wet appearance.
- Weeks 2 to 3: Cloudiness and silver skin can make the tattoo look most faded.
- Weeks 4 to 6: The surface generally becomes clearer while deeper recovery continues.
- Up to three months: The tattoo settles enough for a more reliable evaluation.
If your tattoo has settled but you're considering complete removal or lightening before a cover-up, EradiTatt Tattoo Removal offers personalized laser tattoo removal plans based on factors such as tattoo size, color complexity, skin type, and your goal. Visit EradiTatt Tattoo Removal to explore available Florida locations and request a consultation.